Freitag, 30. November 2012

Day #12

Two weeks are so close!

Cracker dough, such as the dough prepared with this delectable gluten-free sesame seed cracker recipe, is firm enough to roll out and cut into squares or other shapes. For crisp crackers, some fat is necessary. The fat in crackers is what makes them crisp and flaky.
Preparation time: 20 minutes
Cooking time: 10 minutes
Yield: 48 crackers
1 cup plus 3 tablespoons (132 grams) almond flour
1/2 cup minus 2 teaspoons (62 grams) brown rice flour
1/4 cup (29 grams) tapioca flour
1/2 cup sesame seeds
1/2 teaspoon sea salt
1/4 cup cold butter, cut into pieces
1 egg white
1/3 cup almond milk
More sesame seeds and sea salt
  1. Preheat the oven to 375 degrees F. Line two cookie sheets with parchment paper and set aside.
  2. In a large mixing bowl, combine the almond flour, brown rice flour, and tapioca flour; whisk until blended. Stir in the sesame seeds and sea salt.
  3. Using a pastry blender or two knives, cut in the butter until the particles are fine.
  4. In a small bowl, combine the egg white with 2 tablespoons almond milk. Whisk until foamy and then stir it into the flour mixture. Add more milk, tossing with a fork, a tablespoon at a time until you can form a dough by pressing it together.
    The dough should be moist but firm.
  5. Divide the dough in half and place each half on a prepared cookie sheet. Top with another sheet of parchment paper and roll out until the dough is 1/8-inch thick. Remove the top sheet of parchment paper.
    Repeat with the second half of dough on a second cookie sheet.
  6. Cut into squares or other shapes using a sharp knife, cookie cutter, or pizza cutter. Sprinkle with more sesame seeds and a bit of sea salt.
  7. Bake for 9 to 12 minutes, or until the crackers are light golden-brown.
    Cool the crackers on the cookie sheets for 3 minutes and then carefully move them to a wire rack to cool completely.

Mittwoch, 28. November 2012

Day #11

Honey butter is as awesome as eating glutenfree!

And today, we are going to jump right into the recipe! :)

You can serve this flavorful gluten-free honey butter with any type of pancake or waffle, on hot toast, or with corn bread or dinner rolls. Gluten-free bread makes excellent toast, and this recipe enhances its flavor with less fat than butter or margarine. You can keep this honey butter in the refrigerator for up to a month.
Preparation time: 5 minutes
Yield: 16 servings
1/2 cup softened butter or Earth Balance Buttery Spread
1/4 cup honey
  1. Combine the butter and honey in a small bowl and beat until smooth and well-blended.
  2. Cover and store in the refrigerator.
Per serving: Calories 66 (From Fat 51); Fat 6g (Saturated 4g); Cholesterol 15mg; Sodium 1mg; Carbohydrate 4g; Dietary Fiber 0g; Protein 0g.

Dienstag, 27. November 2012

Day #10

Glutenfree Butterscotch...Brownies!

Don't panic, we won't try to brew our own Butterscotch today. I am just going to share this Butterscotch Brownie 100% glutenfree recipe with you all as I really like to drink Butterscotch and I often enjoy those brownies combined with a scotch :) 

Feel free to frost those brownies with Butterscotch or some chocolate (glutenfree of course)


Preparation time: 15 minutes
Cooking time: 35 minutes
Yield: 16 bars
1/4 cup unsalted butter
1 cup packed brown sugar
1 egg
1 teaspoon vanilla
1/2 cup minus 2 teaspoons (63 grams) brown rice flour
1 teaspoon baking powder
1/4 teaspoon salt
1/2 cup finely chopped walnuts
  1. Preheat the oven to 325 degrees F.
    Lightly grease an 8-x-8-inch square baking pan with unsalted butter and set aside.
  2. In a medium saucepan, melt the butter. Add the brown sugar and heat, stirring, until the sugar is dissolved.
    Set aside to cool for 10 minutes.
  3. Beat in the egg and vanilla.
  4. In a small bowl, combine the flour, baking powder, and salt. Stir the flour mixture into the butter mixture. Add the nuts, mixing gently.
  5. Pour the batter into a prepared pan and bake for 25 to 33 minutes, until brownies are set and light golden-brown.
    Cool and cut into bars.

Montag, 26. November 2012

Day #9

100% Health!

Hello you all!

Have you enjoyed your meal the last time? Today is your ninth day and that is awesome because:
  1. 9 x 24hr/s is much time!
  2. We are getting close to your second week goal
  3. ...AND A NEW RECIPE! 
Party party, disco disco: There we go!

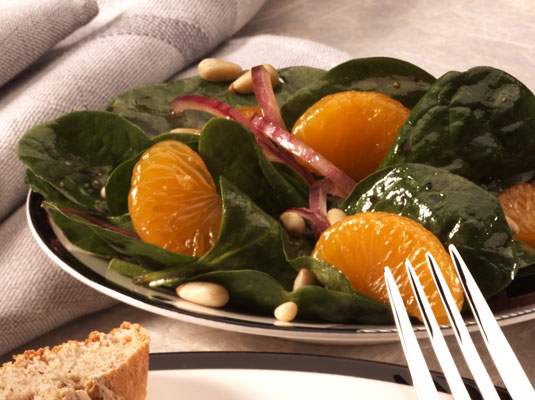
Spinach Mandarin Salad!

Preparation time: 8 minutes
Cooking time: 6 minutes
Yield: 4 servings
1/4 cup pine nuts
spinach salad mandarin glutenfree diet weight loss
2 tablespoons orange juice
1 1/2 tablespoons balsamic vinegar
2 tablespoons olive oil
1/8 teaspoon salt
1/8 teaspoon pepper
2 teaspoons honey
1/2 teaspoon brown mustard
4 cups fresh baby spinach leaves
1/4 red onion
15-ounce can mandarin oranges
  1. Spray a small skillet with nonstick spray.
  2. Place the pine nuts in the skillet.
  3. On medium-high heat, toast the nuts, stirring frequently, until they’re lightly browned.
  4. Remove the pan from the stove and cool.
  5. In a small bowl, whisk together the orange juice, vinegar, oil, salt, pepper, honey, and mustard.
  6. In a large bowl, toss together the spinach and dressing until evenly coated.
  7. Thinly slice the onion quarter.
  8. Drain the mandarin oranges.
  9. Add the pine nuts, onion, and oranges to the spinach.
  10. Toss till evenly distributed.

Samstag, 24. November 2012

Day #8

Have you enjoyed the cranberry bread?

Well, welcome to your first day of the 2nd week! Glad you made it so far, I hope you already feel the power of your glutenfree diet in your body :)

I received this mail a few days ago:

Hello Michael, thanks for your great blog about glutenfree food and your week plans and the informations. However, I would really like to know, what to eat in the morning? I am really tired and can't seem to figure out, what is easy to prepare, tasty and glutenfree? I know you're my man :)
 BTW: Your book is amaaaaaazing. Bought it yesterday and I've been sceptic but you proved me wrong!
xoxo, Barbara 

Thanks again for the input, Barabara. In the morning, I like to enjoy glutenfree cereals. Homemade cereals :)


Yield: 10 cups
Nonstick cooking spray
3 cups gluten-free flour mixture (scroll down for the recipe)
1/2 cup coconut flour
1/4 cup flaxseed meal
1 1/4 teaspoon cinnamon
1/4 teaspoon nutmeg
1 cup brown sugar
1 teaspoon salt
1 teaspoon baking soda
2 cups buttermilk
2 teaspoons vanilla
1/2 cup slivered almonds
1/2 cup dried cranberries

Stage 1

Preparation time: 10 minutes
Cooking time: 30 minutes
  1. Preheat the oven to 350 degrees. Spray a large baking sheet with cooking spray.
  2. In a large bowl, whisk together the flours, flaxseed meal, cinnamon, nutmeg, brown sugar, salt, and baking soda.
  3. In a small bowl, stir together the buttermilk and vanilla.
  4. Stir the wet ingredients into the dry mixture until they’re well blended.
  5. Spread the soft, cookie-like dough evenly in the prepared baking sheet.
  6. Bake the dough at 350 degrees for 15 minutes, and then turn it over (so both sides brown evenly) and bake for another 10 to 15 minutes until it’s golden brown and crisp.
    It’s okay if the dough breaks into pieces.
  7. Place the pan on a wire rack to cool. Let the cereal dough stand, uncovered, for several hours or overnight in a cool place to completely dry out.

Stage 2

Preparation time: 5 minutes
Cooking time: 10-plus minutes
  1. Preheat the oven to 300 degrees.
  2. Break the dry cereal dough into small pieces and chop it in a food processor (a blender works, but not quite as well) until the pieces are the size of dried peas.
  3. Spread the cereal on two baking sheets.
  4. Bake the cereal at 300 degrees for 10 to 15 minutes until it’s crisp and lightly browned. Do not over-bake (or the cereal will turn into rocks!)
    Stir the cereal often during baking.
  5. When the cereal has cooled, stir in the almonds and cranberries and store it in a sealed container.
Per serving: Calories: 369; Total fat: 6g; Saturated fat: 1g; Cholesterol: 2mg; Sodium: 423mg; Carbohydrates: 73g; Fiber: 6g; Sugar: 28g; Protein: 6g.

Gluten-free flour mixture

Preparation time: 5 minutes
Yield: 5 cups
2 1/2 cups rice flour
1 cup potato starch flour
1 cup tapioca flour
1/4 cup garbanzo bean flour
1/4 cup cornstarch
2 1/2 tablespoons xanthan gum
  1. Sift all the ingredients into a large bowl.
  2. Stir ingredients together with a whisk.
  3. Spoon the mixture into a self-seal freezer bag and freeze until needed.

Donnerstag, 22. November 2012

The ultimative "Glutenfree Diet Cookbook"

glutenfree diet cookbook header image

I am glad you are here!

Today is your lucky day. As you know, I am publishing recipes EVERY day on this blog here to help you stay glutenfree and to support your diet! This blog will remain ad free so this is the only income I have! If you buy the book, you don't just support your life and your lifestyle but also the life of this blog :)


Now is your chance to learn about more than 30 never published before recipes + a guide to gluten replacements (3 sites!)

What is included in the eBook:


 30+ recipes for:
Cakes
Cookies
Snacks
Breads
Breakfast
Side Starches
Soups
Wraps
Meals

Plus measuring conversions 
AND 
a temperature guide!


The eBook comes as PDF and is as cheap as dirt

9,99$


Mittwoch, 21. November 2012

First Week Resume - Day #7

Your first week is over! Yeeeeeeeeeeehaaaaaa!


I am glad you are reading this as it means that you successfully passed your first 
100% glutenfree diet week!

Seriously, great stuff! My first week as very hard as I had no one to help me cook or select brands. I always had to read like tons of mini stickers on products to identify if there are some gluten in it and eventually missed the hidden gluten (click here for a list) a few times for sure!

Let's celebrate that with a glutenfree "Cranberry Nut Bread"

You need a bread machine for this one, or you could search for some bread making tutorial on Google.

Anyway, this delicious bread combines the power of gluten free food AND cranberry. They are proven to increase your immune system stability.

Preparation time: 20 minutes

Approximate cycle time: 1 hour and 20 minutes

Yield: 12 to 16 slices

Wet Ingredients

  • 2 large eggs
  • 1/2 cup orange juice
  • 3 tablespoons vegetable oil

Dry ingredients

  • 2/3 cup bean flour
  • 2/3 cup rice flour
  • 1/2 cup tapioca flour
  • 1/4 cup arrowroot powder
  • 1/2 cup sugar
  • 1 teaspoon salt
  • 1 teaspoon baking powder
  • 1/2 teaspoon baking soda
  • Grated rind of 1 orange
  • 1 cup dried cranberries
  • 1/2 cup coarsely chopped pecans

Instructions

  1. Be sure that all the ingredients are at room temperature.
  2. Combine the wet ingredients and pour them into the bread-machine baking pan.
  3. Measure the dry ingredients, including the yeast, and mix well to blend. Place them in the pan.
  4. Place the pan in the bread machine.
  5. Select the Cake or Quick Bread cycle and press Start.

That's it. Enjoy your fresh gluten free bread and see you tomorrow!


Day #6

Start your Glutenfree Diet - Day #6

Glutenfree chips, yeah!

In the all-time best (and sadly worst) food ever, chips are at rank #2, directly behind pizza!
So, as a normal reflex, you, as a "glutenfree diet" participant, also want to have some chips. And a pizza, a beer and probably a lasagna too :)

As for the chips, I've got some good brands for you, entirely gluten free. Just one more day and your first week is over. I think that is awesome!
glutenfree diet frito chips
    glutenfree diet popchips image
  1. Frito-Lay brand potato chips
    1. A well known, international company
    2. contain no gluten ingredients but may be manufactured on the same lines as gluten products 
    3. aren't tested to see if they meet the 20 parts per million gluten standard. 
    4. exercise some caution when choosing Frito-Lay chips 
  2. POPchips potato chips
    1. less oil than regular chips because they are NOT baked or fried
    2. certified glutenfree
    3. seven flavors, they taste great in my opinion
  3. Kettle chips
    1. I know them for a long time, they are my favourites
    2. 100% glutenfree
    3. includes the company's Kettle Brand baked, reduced fat, organic, and krinkle cut potato chips
glutenfree diet kettle chip bag image

Day #5

Start your Glutenfree Diet - Day #5

CheatSheet day!


What Is Gluten, Why Does It Matter to Baking, and Where Does It Lurk?

Gluten is a molecule unique to certain plants, and it is a key component of traditional baking. Gluten consists of two smaller proteins called glutenin and gliadin. When mixed with water, these two proteins combine to form gluten. Gluten is a stretchy substance that holds carbon dioxide in baked goods and gives these goods their texture and structure. Gluten is found in these products:
  • Barley
  • Bulgur
  • Durum
  • Einkorn (a wild wheat species)
  • Hand lotion
  • Kamut (an ancient relative of wheat)
  • Paste glue
  • Play-Doh
  • Prescription medicines
  • Rye
  • Semolina
  • Spelt (an ancient species of wheat)
  • Triticale (a hybrid of wheat and rye)
  • Wheat
  • Wheat pasta

Measuring and Mixing in Gluten-Free Baking

Measuring and mixing are essential to delicious, gluten-free baked goods. Because gluten-free flours are heavier than wheat flours, weighing them (grams) instead of measuring by volume (cups and tablespoons) was a breakthrough. Here are some other points to keep in mind regarding measuring, proportion, and mixing:
  • For the best results with gluten-free ingredients, you should weigh the flours, not measure them by volume. Use a scale set to gram weights and measure each flour you use. Be sure to zero out the scale after each measurement. (By the way, measuring in ounces is called imperial weights while measuring in grams is called metric weights. Just another cocktail party tidbit for you!)
  • The proportion of flours to liquid is different in gluten-free baked goods. Doughs are rare; most of the recipes, even for yeast breads, are batters. Gluten-free flours are heavier and absorb more moisture than wheat flours, so they need a bit more liquid for the baked goods to be tender and moist.
  • If you do measure by volume, be especially careful with flour and mixes. To measure flour with cups, tablespoons, and teaspoons, always spoon the flour into the measuring cup or spoon and then level off with the back of a knife. Never pack the flour, shake the cup, or press on the flour. Don’t scoop the flour out of its container or bag with the measuring cup or you’ll end up with too much flour and your products will be heavy and dry.
  • You usually chill batters and doughs before baking. This gives the flour proteins and starches time to absorb the liquid in the recipe, which helps develop structure and flavor.
  • When substituting flours in gluten-free breads, always substitute by weight. Don’t substitute cup for cup or you’ll end up with a disaster. If a recipe calls for 1 cup of potato starch, which weighs 190 grams, and you want to use tapioca starch, you need to add 190 grams of tapioca starch, not 1 cup — because a cup of tapioca starch (also called tapioca flour) weighs 125 grams! Substituting cup for cup just doesn’t work. Use that scale and substitute gram for gram!
    For example, if you want to substitute corn flour for 3/4 cup of brown rice flour, 3/4 cup of brown rice flour weighs 101 grams, so you need to substitute 101 grams of corn flour, which is 3/4 cup (87 grams) plus 2 tablespoons (14 grams). Of course, not all conversions are that precise. Try to get within 4 grams of the total amount.
  • Mixing, especially for yeast breads, is very different when you use gluten-free flours. First of all, you must mix together the different flours thoroughly before you add them to batters. Gluten-free flours are all different colors. The best way to make sure the flours are well-mixed is to stir them together with a wire whisk until the mixture is one color. Then, you use a stand or hand mixer to thoroughly mix the dry ingredients with the wet ingredients. You really can’t overmix gluten-free batters or doughs because they have no gluten to overdevelop, so beat to your heart’s content!